Light distribution guide
GU10 beam angles from 15° spot to 60° flood
GU10 names the twist-lock base, not the spread of light. Beam angle determines how widely a spotlight distributes its output across the target surface.
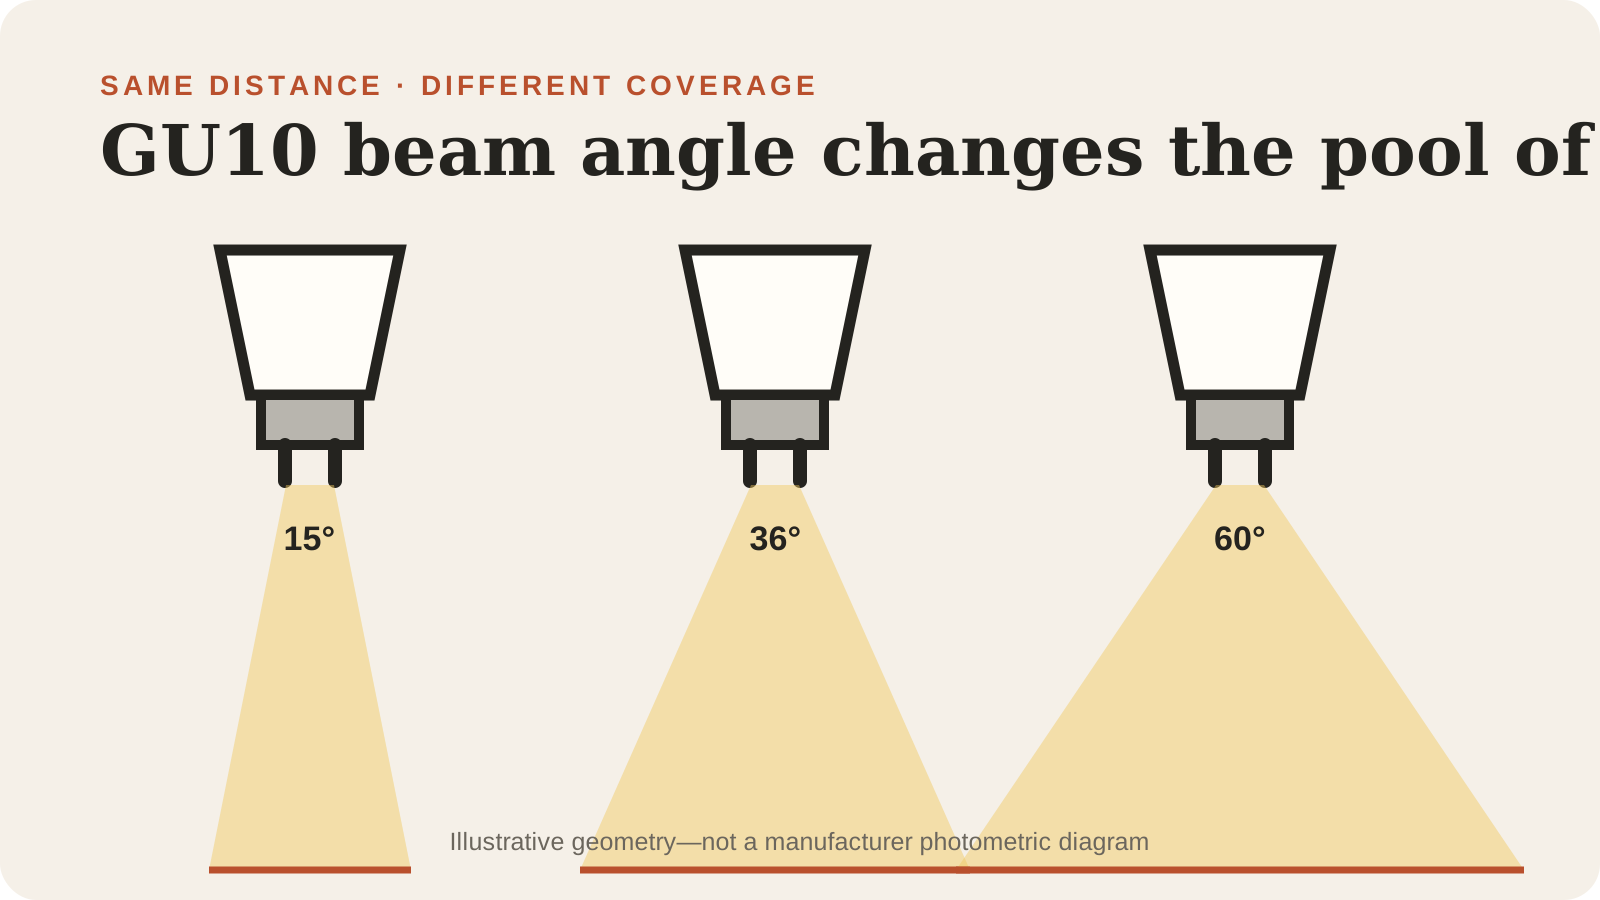
Reference table
Approximate beam diameter at 2 m (6.6 ft)
These estimates use diameter = 2 × distance × tan(beam angle ÷ 2). Real edge softness and intensity come from the manufacturer's photometric data.
| Check | Approximate diameter | Typical starting use |
|---|---|---|
| 15° | 0.53 m / 1.7 ft | Small accent or long throw |
| 25° | 0.89 m / 2.9 ft | Focused object or display |
| 36° | 1.30 m / 4.3 ft | General spotlighting |
| 40° | 1.46 m / 4.8 ft | Moderately broad task light |
| 60° | 2.31 m / 7.6 ft | Wide flood or overlapping coverage |
Codes identify one part of the lamp. The fixture label and exact model specifications still control.
GU10 does not have one standard beam angle
GU10 identifies a two-pin push-and-turn base with nominal 10 mm spacing. It does not prescribe the reflector shape, voltage, lumens, or beam angle. Two GU10 lamps can fit the same socket yet light the room very differently.
Official catalogs show the range. LEDVANCE publishes GU10 PAR16 models with 15°, 36°, and 60° beams. Signify lists Philips GU10 models at 25°, 36°, and 60°. Feit Electric lists current U.S. GU10 reflector models with a 40° beam. These are model-specific examples, not five mandatory categories or a promise that every market sells every angle.
The exact angle belongs on the lamp specification or package. A code such as 36D commonly communicates a 36-degree beam in a product name, but read the technical field rather than decoding a title by assumption. If the old beam angle is available and the existing lighting works, matching it is the lowest-risk starting point.
What beam angle measures
Beam angle describes the angular width of the main beam. In the LEDVANCE specification cited below, the rated beam angle is identified at half peak value. That is a photometric definition; it does not mean everything inside the boundary has identical brightness or that no light appears outside it.
A narrow beam concentrates more of the useful light into a small zone and usually produces a higher center intensity when otherwise comparable. A wide beam spreads light across a larger surface. Lumens describe total light output, while candela describes luminous intensity in a direction, so neither value should be substituted for beam angle.
Reflector and lens design affect the transition at the edge. Two lamps both labeled 36° can have different center intensity, edge softness, glare, or spill. For critical artwork, retail, or architectural lighting, use the manufacturer's polar curve or photometric file rather than relying only on the nominal angle.
Estimate the pool of light from distance
For a lamp aimed perpendicular to a flat surface, a useful geometric estimate is: beam diameter equals two times the distance multiplied by the tangent of half the beam angle. The table above applies that formula at 2 metres. At 1 metre, halve every diameter; at 3 metres, multiply each by 1.5.
For example, a 36° beam at 2 metres produces an estimated 1.30-metre diameter, while a 60° beam at the same distance produces about 2.31 metres. The wider lamp covers more than three times the area because illuminated area grows with the square of the diameter. That does not mean it delivers three times the brightness; the same lumens are being distributed differently.
Treat the calculation as layout guidance, not a guarantee. Tilting the lamp makes an oval footprint. Walls, counters, textured finishes, lenses, trims, and overlapping lamps change what the eye sees. A fixture may also clip part of the nominal beam.
Choose narrow spot, general spot, or wide flood
A 15° or 25° beam is a sensible starting point when the target is small compared with the mounting distance: a sculpture, plant, table centerpiece, sign, or architectural detail. Aim carefully and check glare from normal viewing positions. A tight beam used too close can produce a bright hotspot with a dark surrounding area.
A 36° or 40° beam is a common middle ground for track heads, small recessed fixtures, counters, or general accent lighting. It gives more aiming tolerance than a narrow spot without spreading as broadly as a 60° flood. The correct choice still depends on the target dimensions and mounting distance, not the room label alone.
A 60° beam is useful for broader coverage, lower mounting heights, or smoother overlap between several lamps. It may reduce scalloping on a wall or gaps across a work surface. If the fixture is high or the target is small, however, the center may look less emphatic than it did with a narrower beam of comparable lumens.
Do not choose beam angle in isolation
First confirm that the lamp is actually GU10 rather than a straight-pin GU5.3 MR16. Then match the fixture voltage and check reflector diameter, overall length, and trim clearance. Beam choice cannot correct an incompatible base or electrical rating.
Compare lumens and, for directional lighting, luminous intensity when the manufacturer supplies it. Also match color temperature and color rendering where the lamp illuminates food, artwork, finishes, or merchandise. For dimmed lighting, the exact LED must be labeled dimmable and compatible with the installed control.
Recessed fixtures, range hoods, and outdoor luminaires add heat, enclosure, appliance, or moisture requirements. The Department of Energy advises checking explicit enclosed-fixture suitability because trapped heat can affect some LED products. GU10 and a preferred beam angle establish neither that rating nor range-hood approval.
Choosing an angle for the existing layout
Photograph the old lamp and fixture label before shopping. Record the GU10 base, voltage, actual watts, lumens, beam angle, color temperature, maximum diameter, overall length, dimming claim, and fixture restrictions. If only the angle is changing, keep the other important specifications as close as the task requires so the result is easier to evaluate.
For a new layout, measure the lamp-to-target distance and desired target diameter. Use the table or formula for an initial angle, then check an official model with that beam and appropriate intensity. Test one lamp before replacing a whole room when possible; human perception, surface reflectance, and fixture spacing matter more than a diagram can capture.
- Use 15°–25° as a narrow accent starting range.
- Use 36°–40° as a general spotlight starting range.
- Use 60° when broad or overlapping coverage is the priority.
- Calculate from mounting distance and target diameter rather than room name alone.
- Verify base, voltage, dimensions, controls, and fixture ratings separately.
Before you buy
A quick replacement check
- Confirm the GU10 twist-lock base and fixture voltage.
- Record the old beam angle when preserving an existing effect.
- Measure the distance from lamp face to the target surface.
- Estimate coverage with diameter = 2 × distance × tan(angle ÷ 2).
- Compare lumens and luminous intensity as separate specifications.
- Check reflector diameter, overall length, trim, and aiming clearance.
- Verify dimming, enclosure, appliance, and location ratings on the exact model.
Common follow-ups
Questions people ask next
What is the beam angle of a GU10 bulb?
GU10 has no single beam angle. Official current and recent product records include 15°, 25°, 36°, 40°, and 60° examples. Check the exact lamp specification.
Is 36° a spot or a flood?
Manufacturers may use category terms differently. Treat 36° as a medium or general spotlight starting point and use the numeric angle, mounting distance, and target size for comparison.
How wide is a 36° beam at 2 metres?
The geometric estimate is about 1.30 metres, or 4.3 feet, in diameter. Real intensity and edge softness depend on the lamp optics and fixture.
Is a wider GU10 beam brighter?
Not necessarily. Beam angle describes spread, while lumens describe total output and candela describes directional intensity. A wider beam can illuminate more area but have lower center intensity than a narrower beam with similar lumens.
Which GU10 beam angle is best for a kitchen?
There is no universal kitchen angle. Use mounting height, spacing, counter width, fixture aiming, glare, and the desired overlap. A 36°–40° beam is a practical comparison point, while 60° gives broader coverage.
Can I replace a 36° GU10 with a 60° GU10?
Yes only if all other compatibility checks pass, but the lighting effect will change. At the same distance, the 60° pool is substantially wider and usually less concentrated at the center.
Checked against
Sources
- Manufacturer documentLEDVANCE — LED PAR16 50 15° DIM P 4.9W 927 GU10 ↗Accessed 2026-08-25
- Manufacturer documentLEDVANCE — ST PAR 16 50 36° 4.3 W/2700K GU10 Product Datasheet ↗Accessed 2026-08-25
- Manufacturer documentSignify — Philips MASTER LED spot ExpertColor GU10, 25° ↗Accessed 2026-08-25
- Manufacturer documentSignify — Philips Essential LED spot GU10, 36° ↗Accessed 2026-08-25
- Manufacturer documentSignify — Philips MASTER Value LED spot GU10, 60° ↗Accessed 2026-08-25
- Manufacturer documentFeit Electric — 50W Replacement Warm White MR16 GU10 Reflector LED, 40° ↗Accessed 2026-08-25
- Public guidanceU.S. Department of Energy — Purchasing Energy-Efficient Light Bulbs ↗Accessed 2026-08-25